Running & Passing Plays Crew Card
Reflects the 2026 NFHS rules year. Built from the 2026 and 2027 NFHS Football Game Officials Manual — §3.3 and §3.7–3.8 (pp. 55–79) for crews of four, §4.3 and §4.7–4.8 (pp. 110–150) for crews of five. Last checked September 2, 2026.
Verify against the current rule book and VPA guide before teaching this as authoritative.
Where every official starts on a play from scrimmage and what each one keys on — for crews of five and crews of four.
Download the Running & Passing Plays Crew Card (PDF, 2 pages) — print at 100% on Letter, two-sided, flip on the long edge.
Associations amend these — check Vermont's guidance before teaching it. This is the companion to the Kicking Plays Crew Card.
In every diagram below the white marker is the Referee, and the press box is on the right. What is the Referee's alone appears under "Referee — white hat only."
Every down
Ball is spotted · get to your initial position.
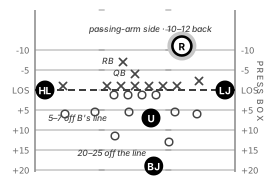
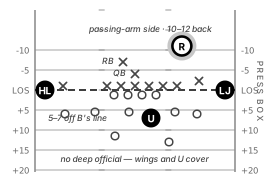
Everyone on this play
- Know the line to gain before the snap. Wings point it out to each other.
- Count, hold the signal two seconds, and get eye contact before you drop it. The formation tells you your work — know your receiver(s) before the ball moves.
- Wings count players on the line on their side of center and signal each other — two hands at the waist for balanced, two and four fingers for unbalanced. Punch off the nearest player who is off the line.
Referee — white hat only
- Count A with the Umpire — 11, held two seconds. A's substitutions in and out of the huddle are yours.
- Mark the ball ready only after A is behind their line, and on a first down only after the down box is set.
- If A is at the line or moving to it, back-pedal to your position before marking it ready.
- Your side is the quarterback's passing arm, not the wide side. Ask the head coach in pregame which arm he throws with. In a crew of 4 you also announce the play clock: five, then 4–3–2–1.
Initial position
| Crew of 5 | Crew of 4 | |
|---|---|---|
| R | While A huddles: 10–15 from the line, 5 wide of the huddle, where the clock operator can see you. Once A is at the line: passing-arm side of the QB, 10–12 deep, at least as wide as the tight end. | Same. Plus the play clock: five seconds, then 4–3–2–1 out loud. |
| U | 5–7 yards behind B's line, between the defensive ends. You must see the ball from the snapper's first touch until the snap. Counts A's five ineligible linemen and checks their numbers. | 5–10 yards behind B's line. Plus counts B's 11 and owns B's substitutions. |
| HL / LJ | Straddling the line of scrimmage, on the sideline — working the sideline is strongly encouraged. Line to gain, substitutes, motion on your side of centre. | Same. |
| BJ | Favouring the strong side, 20–25 yards beyond the line and deeper than the deepest defender. Counts B, owns B's substitutions and the play clock. | — |
Wings show A the line with the backfield foot, then set their feet parallel. Legality of motion belongs to the official the player is moving away from, even if he reverses and comes back. In a crew of 4 there is no deep official — say out loud who has the deep middle before the game starts.
Running plays
Snap between the –10 and the +10 · run from scrimmage.
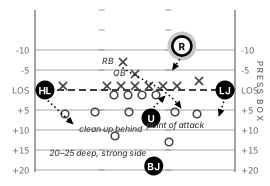
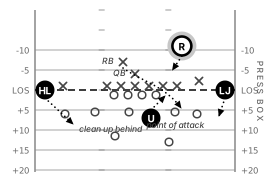
Everyone on this play
- Read the guard and tackle first — run or pass. Everything after that follows from that read.
- Officiate the point of attack, then the action on the runner after the tackle. Swivel twice — the foul usually comes after the whistle.
- Wings mark forward progress with the downfield foot and square off. When the runner crosses to the far side zone, the backside wing comes in to the near hash at 45° and cleans up behind the Umpire.
Referee — white hat only
- Keys: snap · QB · the handoff · QB again · line play at the point of attack.
- Keep your eyes on the QB after the handoff. If he rolls, follow him with a ten-yard cushion.
- Then check line play at the point of attack and the action around the runner.
- You rarely need to run to the dead-ball spot at or beyond the line. Stay back, swivel twice, then hustle to your spot.
Keys
| Crew of 5 | Crew of 4 | |
|---|---|---|
| R | Snap · QB · handoff · QB · line play at the point of attack. You key the opposite-side tackle. | Same as a crew of 5. |
| U | Snap · linemen · blocking at the point of attack · the runner. You key the centre and both guards. Spot the ball shoulders parallel to the sideline, then move off it quickly. | Same, and you are the only one in the middle. Blocks beyond the point of attack are yours. |
| HL / LJ | Snap · line play · blocks downfield · the runner. Line play at the point of attack and receivers ahead of it. The sideline is yours. | Same, but you get downfield blocks on your half with no help behind you. |
| BJ | Snap · tight end and tackle · receivers · line play beyond the point of attack · the runner. Watch for crackbacks. | — |
The Back Judge stays home on a run read — move back only once the runner breaks the line. In a crew of 4 nobody is deep, so the wings stay wider and longer before coming in to clean up.
Passing plays
Snap between the –10 and the +10 · a pass is thrown.
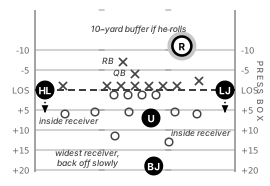
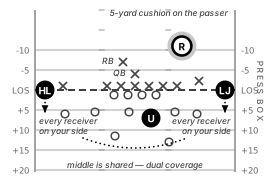
Everyone on this play
- Watch the ball's initial trajectory, then watch the players — not the ball. Feet first, then the catch, on every sideline and end line play.
- Stop and watch at the moment of judgment — you see far more standing still than moving.
- Coverage: the Back Judge keys the widest receiver on the strong side, each wing the inside receiver on his side (keys table). Zone once receivers clear.
Referee — white hat only
- Keys: snap · QB · the opposite tackle · the passer. Be wide and deep enough that a pocket drop does not move you; 10-yard buffer if he rolls, and keep it if he rolls.
- Yell "ball's away." On a backward pass, signal and yell "back."
- Eyes stay on the passer after the ball is gone. Don't be a head wagger.
- Passer near the line: memorize the spot of release, get to it, check beyond-or-behind with your Umpire. Rule pass or fumble on a hit passer.
Keys
| Crew of 5 | Crew of 4 | |
|---|---|---|
| R | Snap · QB · opposite tackle · passer. | Same as a crew of 5. |
| U | Snap · linemen · QB · the pass · the catch. Quick pass, no time to reach the line; delayed pass, read the crossing end or the screen. Rules the trapped pass. | Same as a crew of 5. |
| HL / LJ | Snap · player(s) · QB · zone · ball. Inside receiver on your side. Three reads in order — flat or bubble: stay home. Short/medium: down five and stop. Long: turn and burn. | Every receiver on your side is yours, and the middle of the field is dual coverage with your partner. |
| BJ | Snap · player(s) · QB · zone · ball. Widest receiver on the strong side. Back off slowly; lock on once you know where the ball is going. | — |
The passer's first look is usually where the ball goes.
Goal line
Snap on or inside the +10 · also the run/pass try.
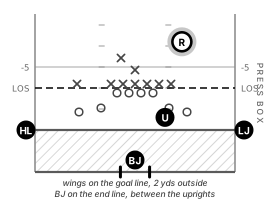
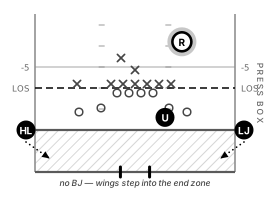
Everyone on this play
- Wings must be standing on the goal line before the ball gets there, two yards outside the pylon — start moving at the snap from the +10, hustle straight there from the +5.
- Never mirror a touchdown signal. Make eye contact first; if anyone has an incomplete pass, that comes out immediately.
- Find the ball before you sell anything — better late and right. The Umpire never signals a touchdown; he tells the wing and the wing decides.
Referee — white hat only
- Same position as a run or pass: 10–12 behind, passing-arm side of the QB.
- After a touchdown, watch the players moving toward the sideline. You do not signal the score to the press box.
- Ask the captain where he wants the ball spotted for the try before anyone spots it.
- Backed up inside A's own 10? See below — your position and the goal line both change.
Initial position
| Crew of 5 | Crew of 4 | |
|---|---|---|
| R | Passing-arm side of the QB, 10–12 deep, at least as wide as the tight end. | Same as a crew of 5. |
| U | 5–7 yards behind B's line, between the defensive ends. | 5–10 yards behind B's line. |
| HL / LJ | Two yards outside the sideline, on the goal line. | Two yards outside the sideline on the goal line. Step into the end zone to see a catch near the end line. |
| BJ | On the end line between the uprights. Stay there while the ball is live; straddle the end line on a tight catch. | — |
Only the Back Judge signals an incomplete pass on the end line. In a crew of 4 there is no Back Judge, so the end line is uncovered until a wing gets there.
Backed up — reverse mechanics
Snap inside A's own 10 · association practice, not the manual.
The NFHS manual does not move the Referee when Team A is backed up — §3.8 p. 77 gives him the same spot coming out as on any other scrimmage down, and §4.8 p. 148 changes only the wings, who go quickly to the goal line when the snap is at or inside A's 5. What follows is the reverse mechanic many associations teach. Confirm it in pregame before you use it.
- The Referee moves to the end line — 8 wide of the QB at 45° on his passing-arm side, so an errant snap stays in front of him. Snap between the –10 and –15: 10 wide on the goal line instead.
- Everyone else holds their normal spot — Umpire 5–7 behind B's line, wings straddling the line on their sidelines, Back Judge 20–25 beyond it. A punt overrides all of this: the Head Line Judge stays on the line until the kick crosses.
- The goal line belongs to the wings. The Referee points at them, then at it; they point back. Inside the –2 they go to the goal line at the snap; from the –5 to the –2 they slide and read the QB and back; from the –10 to the –5 they pause and read the rush.
- Once the ball reaches the 10 it is no longer backed up. The Referee takes the goal line back and signals it. If the QB rolls at him he backs up and straddles the line — never open the door.
Positional keys
Crew of 4 is one sentence: each wing keys the eligible receivers on his own side, and where there is more than one, the primary key is the receiver on the end of the line — the tight end or split end. Flankers, slot backs and motion men are secondary. The Referee keys the opposite-side tackle; the Umpire keys the centre and both guards.
Crew of 5 works off strength. In a balanced formation, strength is always declared to the Line Judge's side.
| Formation | HL | LJ | BJ |
|---|---|---|---|
| Balanced, strength to LJ | Both receivers on your side | The flanker | The widest (the split end) |
| Double tight ends, strength to HL | The tight end | The tight end on your side | The wingback on the HL side |
| Trips | To you: the inside receiver. Away: the end on your side | To you: the two inside. Away: the end nearest you | Two widest if to the HL; the widest if to the LJ |
| Motion changes strength to LJ | Motion man must not cut upfield before the snap; then the split end on your side | The flanker (the motion man) | Shift and key the strong-side split end |
Legality of motion always belongs to the official the motion man is moving away from, even if he reverses and comes back to where he started. That is stated four times in the manual and it is the one keying rule crews get wrong.